Sunday 7 August 2016

Moto Z Droid ( Full Review ) And Price

Since lenonovo acquisition of motorola has completed,lenovo stepped up their game by developing a successor to the (Moto X) which came with alot of awesome features. Unlike (Moto X) the (Moto Z) which had alot specs rumors online.

       
Lenovo finally released the official spcecs online, Also, some keen features of (Moto X) were scrapped namely (Motor Maker) It allowed consumers to customize (aesthetically) their Moto X exactly how they wanted, but we haven't heard it mentioned for the Moto Z. It seems that Lenovo doesn't think Moto Maker is worth the trouble, anymore. Well, at least for now. Maybe the company will bring it back or launch it later closer to the holiday season.    


This review is based on the Moto Z Droid, which is the US version of the internationally available Moto Z. The phone is available exclusively on Verizon's network in the US. The carrier has successfully held onto its exclusive 'Droid' branding for about 7 years now which kicked off with the Motorola Droid, then the Droid RAZRs, and more recently the Droid Turbo 2, all of which were Verizon exclusives in the US. This is also the first time a "Droid" device shares the "Moto" branding as well. It looks like Verizon's terms with the Droid branding have changed seeing as there is no sign of "Verizon" branding on this phone.Check out some key features below:

KEY FEATURES
  • 5.5" AMOLED screen, QHD (1440x2560 / 535 ppi), Gorilla Glass,
  • Water-resistant nano-coating (splash-proof but not submersible)
  • Qualcomm Snapdragon 820 - dual-core 2.15 GHz Kyro & dual-core 1.6 GHz Kyro w/ Adreno 530, 4GB of RAM
  • 32 or 64GB of internal storage, microSD expandable up to 2TB
  • Android 6.0.1 Marshmallow with Moto Enhancements (Moto Voice, Moto Display, and Moto Actions)
  • 13MP camera, f/1.8 aperture, 1.12-µm pixels, OIS, laser autofocus, dual-tone LED flash. 1080p video @ 30 or 60fps, 4K @ 30fps.
  • 5MP front-facing camera with wide angle, front-facing LED flash
  • Fingerprint sensor
  • U.S. Version - CDMA: 850, 1900MHz, GSM/GRPS/EDGE (850, 900, 1800, 1900MHz), UTMS/HSPA+ (850, 900, 1700, 1900, 2100MHz), LTE Bands: 2, 3, 5, 7, 13
  • 2,600 mAh battery, Moto 15W Turbo Charger USB

Not to exaggerate but any phone with this kind of specification is going to perform well.we are expecting a huge improvement with the camera as Moto X was known for low light performance when taking pictures.so,we are eager to see if lenovo will be able to surprise us by  developing a much better camera.

The Moto Z is now available at Verizon for $624 or $26 per month when you opt to pay for the phone in installments over 24 months. 
Read Full Post;

Saturday 6 August 2016

How to Root Any Android Phone within 5 minutes

Hey guys,Are you finding it difficult to root your android device? I know how some Android devices might be stubborn when trying to gain their root access such brands like (HTC,MOTOROLA,SAMSUNG) which are one of the top brands in the smartphone market. These brands produce some of the top Android devices every year,which without (Root Access) you might not be able to enjoy some of the cool features that come with the phones.          


INTRODUCING (KING ROOT) 
Kingroot is the top App used to gain root access of any smartphone by many developer's.the software was design to root any android device in a few minutes.
Kindly follow the steps below to root your Android device within 5 minutes.


HOW TO ROOT ANDROID DEVICES WITH (KINGROOT)
First,you need to download kingroot from GooglePlay store Or you can download it from the link below:
Download kingroot for Android

Download Kingroot for PC

  1. Install the downloaded KingRoot v4.9.5 on your device
  2. After successful installation, start the application and wait for Kingroot to fully analyze your device, after a few seconds you will see the main window,
  3. Click the Big Blue Circle on your device that says Root and wait for a few minutes (make sure you have a good internet connection).
  4. Wait for the rooting to complete 100% after which King User app will be installed on your device.
HOW TO VERIFY IF YOUR DEVICE HAS BEEN ROOTED
To verify whether your smartphone has been rooted or not,Kindly download Root checker from google playstore,install and run it,you will get a success message indicated with green colour.
If you still find it difficult to root your Android smartphone,feel free to ask any question in the comment box below.

Cheers! 
Read Full Post;

Friday 5 August 2016

How to make Glo 0.00 Free browsing stable without Disconnection ( Updated)

Hey guys,As you all know Glo N0.00 free browsing tweak has been blazing for weeks via psiphon handler and Tweakware,but most people do complain that its unstable and does not connect at all.well,today is your lucky day.Just follow the steps below to set up your (Psiphon A+ VPn). if you dont have it you can download it below.  

NOTE!  To make this tweak work perfectly on your device, you need to have a strong and stable 3G signal in your area,if not you might experience some difficulties Using this tweak.Anyway, Follow the steps below to enjoy the tweak       

APN SETTINGS
Name:Techgeez
APN: glosecure
Username: gprs
Password: gprs


HOW TO SET UP YOUR PSIPHON
First,you need psiphon A+ pro,if you don't have it you can download it from the link below.

Download  Psiphon A+ Pro apk android app here psiphon a+ pro

Open it and Tick remove port Proxy

server type: real host

Proxy server: redirect.glo.com

Real proxy server type: SOCKS

Port: 80

Region: United States


MAIN DISADVANTAGE OF THIS TWEAK
After you might have set up everything successfully,you need to wait for 2 to 5 minutes before it connects,but once connected, you are good to go.

Are you stil experiencing difficulties? Feel free to Drop your comments below, and if you are already using the tweak,kindly share your experience.


Read Full Post;

Wednesday 3 August 2016

Smasung galaxy Note7 (Review)


Samsung just launched the Long anticipated (Galaxy Note7) which had alot of controversial specs rumors online, Finally Samsung decided to break the ice by launching the (Galaxy Note7) which by the way is one the best Smartphone out there, The Samsung (Galaxy Note7) came with alot awesome features.

The Samsung Galaxy Note7 stands at the heart of a multifaceted ecosystem that is supported by three pillars - business, games and multimedia.

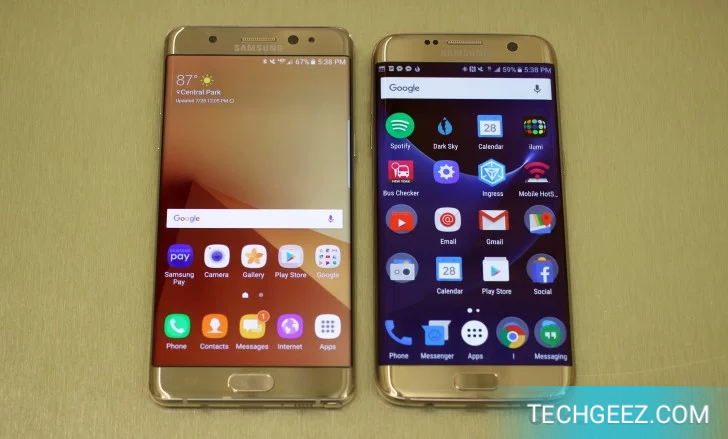
Samsung Galaxy Note7 (left) next to the S7 edge (right)
The Galaxy Note7 wants to rule mobile gaming. VR especially, with a redesigned Gear VR. The phone supports the new Vulkan API, which is just starting to gain ground with PC games. As a nice bonus, you get $25 worth of "console-quality" games at launch.


On the business side, the improved S Pen collaborates with the Always-on screen for even easier note taking. The iris scanner works with KNOX and Samsung Pay to secure your data (both work and personal) and your money even tighter than before.


The Samsung Galaxy Note7 is a media creation and a consumption nexus too. It's one of few mobiles that can display HDR video (an up and coming tech for 4K TVs). With the Gear 360, it can also snap VR-ready panoramas too.


Other accessories come into play too. The phablet's 3,500mAh battery is paired with two new power saving modes and can use an optional wireless quick charger for quick cable-free top-ups. Active users have the Gear IconX wireless headphones and the Gear Fit 2 smart band to look forward to (and you can score the Fit 2 for free!). Also, the S Pen works underwater, so activities are not limited to dry land.

Yes, the Galaxy Note7 is the first Note to get waterproofed - it holds an IP68 certification.

Samsung's own research shows that Note owners use 50% more productivity and business apps than Galaxy S7 owners. And they consume 30% more multimedia. Let's see if the new Galaxy Note7 can live up to the magic created by its predecessors.

Read Full Post;

Tuesday 2 August 2016

How I Added Related Posts Widget To Blogger Blog


Many young bloggers out there usually find it difficult to design and Add some Important widgets on there blog (Related post) widget being at the top of that list,because lets face it, Many readers of your  blog will spend more time on our blog after reading a post,  
If they see more related posts.This will not only increase your page views but it'll make your readers spend more time on your blog.


The realated post widget will show a specific number of post's having the same same label as the current post below your blog posts.


To add Related post widget to your blog,Kindl follow the steps below

===> Log into your blogger dashboard
===> From there goto Layout > Edit HTML and tick the expand your widget templates box (option on the right). If you are using new Blogger dashboard, go to Template > Edit HTML
==> Click inside the HTML and use CTRL+ F to find </head>

Right above  </head> paste the code below.


<!--Related Posts Scripts and Styles Start-->
<style>
#related-posts {
float : left;
width : 350px;
margin-top:20px;
margin-left : 5px;
margin-bottom:20px;
font : 11px Verdana;
margin-bottom:10px;
}
#related-posts .widget {
list-style-type : none;
margin : 5px 0 5px 0;
padding : 0;
}
#related-posts .widget h2, #related-posts h2 {
font-size : 20px;
font-weight : normal;
margin : 5px 7px 0;
padding : 0 0 5px;
}
#related-posts a {
text-decoration : none;
}
#related-posts a:hover {
text-decoration : none;
}
#related-posts ul {
border : medium none;
margin : 10px;
padding : 0;
}
#related-posts ul li {
display : block;
background : url(https://blogger.googleusercontent.com/img/b/R29vZ2xl/AVvXsEhFzoE04T0dV6UATJOMBvWSjRxXq4UGiotcp9RAXnaXBKySz_Hy17CDDPArWfS9f1bjydRpqjL5vjc3F2EQNI7lWwjpCAsxC1P4wJ-BzwXEhLvBjuKmMuE8av_wi7As1SDn4u9lR_Vxdys/s200/greentickbullet.png) no-repeat 0 0;
margin : 0;
padding-top : 0;
padding-right : 0;
padding-bottom : 1px;
padding-left : 21px;
margin-bottom : 5px;
line-height : 2em;
border-bottom:1px dotted #cccccc;
}
</style>

<script type='text/javascript'>
//<![CDATA[
var relatedTitles = new Array();
var relatedTitlesNum = 0;
var relatedUrls = new Array();
function related_results_labels(json) {
for (var i = 0; i < json.feed.entry.length; i++) {
var entry = json.feed.entry[i];
relatedTitles[relatedTitlesNum] = entry.title.$t;
for (var k = 0; k < entry.link.length; k++) {
if (entry.link[k].rel == 'alternate') {
relatedUrls[relatedTitlesNum] = entry.link[k].href;
relatedTitlesNum++;
break;
}
}
}
}
function removeRelatedDuplicates() {
var tmp = new Array(0);
var tmp2 = new Array(0);
for(var i = 0; i < relatedUrls.length; i++) {
if(!contains(tmp, relatedUrls[i])) {
tmp.length += 1;
tmp[tmp.length - 1] = relatedUrls[i];
tmp2.length += 1;
tmp2[tmp2.length - 1] = relatedTitles[i];
}
}
relatedTitles = tmp2;
relatedUrls = tmp;
}
function contains(a, e) {
for(var j = 0; j < a.length; j++) if (a[j]==e) return true;
return false;
}
function printRelatedLabels() {
var r = Math.floor((relatedTitles.length - 1) * Math.random());
var i = 0;
document.write('<ul>');
while (i < relatedTitles.length && i < 20) {
document.write('<li><a href="' + relatedUrls[r] + '">' + relatedTitles[r] + '</a></li>');
if (r < relatedTitles.length - 1) {
r++;
} else {
r = 0;
}
i++;
}
document.write('</ul>');
document.write('<a href="http://www.ogbongeblog.com/2012/01/how-i-added-related-posts-widget-to.html" target="_blank" rel="nofollow"><font size="1" color="black">[Get Related Posts Widget for Your Blog]</font></a>');
}
//]]>

</script> 

<!--Related Posts Scripts and Styles End-->


Click on Save template

Click on save template

Now use CTRL+F to find this line of code


<div class='post-footer-line post-footer-line-1'> 


OR


<p class='post-footer-line post-footer-line-1'>

Now paste the code below immediately after any of these lines (whichever you could find): 

<!-- Related Posts with Thumbnails Code Start-->
<b:if cond='data:blog.pageType == &quot;item&quot;'>
<div id='related-posts'>
<font face='Arial' size='3'><b>Related Posts: </b></font><font color='#FFFFFF'><b:loop values='data:post.labels' var='label'><data:label.name/><b:if cond='data:label.isLast != &quot;true&quot;'>,</b:if><b:if cond='data:blog.pageType == &quot;item&quot;'>
<script expr:src='&quot;/feeds/posts/default/-/&quot; + data:label.name + &quot;?alt=json-in-script&amp;callback=related_results_labels&amp;max-results=5&quot;' type='text/javascript'/></b:if></b:loop> </font>
<script type='text/javascript'> removeRelatedDuplicates(); printRelatedLabels();
</script>
</div>
</b:if>
<!-- Related Posts with Thumbnails Code End-->


Click on Save Template.

Now, go ahead to view one of your blog posts. You should see the Related posts below it.

NOTE: If you did not add a label (category) to a post, you might not see the related posts below it.

You can alter the CSS rules if you want to customize the look and feel

Feel free to share your recommendations or or questions via the comment box


Read Full Post;

Saturday 30 July 2016

How To Setup Glo 0.0kb Unlimited Free Browsing Tweak Via Tweakware VPN v3.2

Over the past week,many coded guys have been surfing the internet with the Glo N0.0 free browsing cheat,I posted a manual setting on how to use it with psiphon if you one the people that missed out you can check here .

Glo 0.0kb free browsing has been giving a lot of us headache over the past few days on Psiphon VPN, isn't working for most of us. But Tweakware has decided to add Glo 0.0kb to it latest update, but it's not available on Play Store yet but I will drop a link for you to download it.

SETTINGS FOR GLO 0.00 UNLIMITED FREE BROWSING ON TWEAKWARE V3.2

I will be fast with this settings, kindly follow me step after steps to enjoy this with me.

First of all, sms PAYU to 127. You will receive a reply that you are using data as Pay As U Go to browse. If you are already on PAYU, don't bother sending the text again.

Now set your Android APN.
APN SETTINGS

APN NAME: gloflat
APN: gloflat
Proxy: 127.0.0.1
Port: 8080
Username and password: gloflat
(Or use the default Glo APN settings)

Now, download the latest tweakware vpn v3.2 HERE.

After successful download and installed, open the app and set it as follows:
Go to Settings => Bundle Settings => Select Bundle Settings and tap on NG GLO 0.0.


Go back to the homepage and select Free Server if you don't have a premium account with Tweakware.
After that, tap on Connect, it should connect immediately within 10secs. You must have strong 3G network on your Glo line inorder to enjoy this well.


That's all.
If you have any problem or confused about this settings, kindly comment below.

Read Full Post;

Thursday 28 July 2016

How I subscribed to Airtel 1.5GB for N50 night plan

Over the past week airtel scrapped there hourly night plan due to unknown circumstances. The new Night plan is cheaper than the former ones, and it is not timely based because its data capped so you'll be given a specific amount of data to browse and download.with the new Night plan you get N25 for 500mb and N50 for 1.5GN which can only be used from 12:00am midnight to 5:00am.

NOTE! You must migrate to Airtel SmartTribe Tariff Plan before your SIM will be eligible for the night plan. Although, SmartTribe Tariff plan offers a flat call rate of 11k/s calls charges for all national networks (N6.60K/min). Which is absolutely cheap.

How Can I Migrate To Airtel SmartTrybe Tariff Plan?
Simply dial then *312# reply with 1

How To Subscribe To Airtel N50 For 1. 5GB And N25 For 500MB Night Plan

Kindly Dial *312*3#
OR
Dial *312# - Then reply with 3 for 500mb for N25 and 1.5GB for N50 [Night Plan 12am - 6am]


After you are through with step 1&2, you'll receive a pop up notification show in my screen shot below.That's all
NOTE! The plan is compatible with all devices.


Still confused?? Kindly Drop your comment below.
Read Full Post;

Wednesday 27 July 2016

Tecno Droidpad 7c Pro!!! All Uneed In A Tablet At Affordable price N25,000

Tecno just launched the long anticipated Tecno Droidpad 7C pro the tablet which to my surprise has alot of great features every Android Tablet should have,He tabet has low camera quality (Disappointed). It has a huge 3000mAh battery.The tablet come with a 7-inch (1020×600 pixels) Ips display, not mention but few.Check out the full specs below:


FULL SPECIFICATION

DISPLAY

  • 7-inch (1024 x 600 pixels) IPS display

PROCESSOR
  • 1.3 Quad-Core Mediatek MT8321 processor
  •  with Mali 400 GPU

STORAGE
  • 1GB RAM, 16GB internal storage
  •  expandable memory up to 32GB with microSD

OPERATING SYSTEM
  • Android 5.1 (Lollipop)

SIM
  • Dual SIM (Standard + micro)


CAMERA
  • 2MP rear camera with LED Flash
  • 2MP front-facing camera with flash

FEATURES
  • 3.5mm audio jack, FM Radio
  • Dimensions:190 x 110 x 8.5 mm; Weight: unknown

CONNECTIVITY
  • 3G, Wi-Fi 802.11 b/g/n,
  •  Bluetooth 4.1, 
  • GPS

BATTERY
  • 3000mAh battery


Read Full Post;

Tuesday 26 July 2016

HOT!! How to make Glo N0.00 Stable without Disconnecting


SETTINGS FOR GLO 0.00 UNLIMITED FREE BROWSING ON PSIPHON 

Many people have been surfing the Internet with Glo N0.00 for quite a while now ,but many people do complain that it disconnects easily, well,I am here to save the day. Because I have cracked a new method on how to use the cheat without disconnection, I have downloaded movies with it, and also stream some videos online,without wasting your time follow the steps below:

1.Before you start,sms PAYU to 127. You will receive a reply that you are using data as Pay As U Go to browse

APN SETTINGS
APN NAME: gloflat
APN: gloflat
Proxy: 127.0.0.1
Port: 8080
Username and password: gloflat

Download Psiphon Pro Lite handler if you don't have it,Download it.
2.Tick Remove Port
Proxy type: real host
Proxy server:http://redirect.glo.com
Real proxy type: default
Real proxy server: leave it blank
Real proxy port: 80
Now tap on Save.
As seen in my below screenshot


Goto Option => More Options and Untick every boxes as seen in my below screenshot.


Now go back and select Region as United States or United Kingdom and tap on Start to connect.
It will connect within 1 to 3mins.


Now that I've shared this, if there are loads on the IP in the APN, it'll start misbehaving. I know how stable it is right now as i am using it alone. We just hope it won't get blocked anytime soon.

That's all.


Read Full Post;

Saturday 23 July 2016

what happen's when a Nigerian guy spend 2 weeks in America,


Hilarious....
Read Full Post;

Friday 22 July 2016

Hot!!! Get 7GB with N2000 on MTN dealzone


 Mtn just announced a new Data plan called MTN TECH+ with N2000 you can get 7GB,cool huh?

Follow the steps below to get yours

  • Simply Send 2016 to 131 you'll be credited with 7GB valid for two months
  • Check out some screen shots below


Cheers!.....
Read Full Post;

Thursday 14 July 2016

Airtel Launched Another Night Plan - N25 500MB And N50 1.5GB

Airtel just launched Another exciting Night plan After scrapping out their previous Night plan Due to unknown circumstances,but I think the new Night plan is much more better and cheaper than the previous ones, without wasting much of your time check out the subscription procedure below

The new Night plan is cheaper than the former ones, and it is not timely based because its data capped so you'll be given a specific amount of data to browse and download.with the new Night plan you get 500mb fwith N25 and 1.5GB with N50 which can only be used from 12:00am midnight to 5:00am

NOTE: You must migrate to Airtel SmartTribe Tariff Plan before your SIM will be eligible for the night plan. Although, SmartTribe Tariff plan offers a flat call rate of 11k/s calls charges for all national networks (N6.60K/min). Which is absolutely cheap.

How Can I Migrate To Airtel SmartTrybe Tariff Plan?
Simply dial then *312# reply with 1


How To Subscribe To Airtel N50 For 1. 5GB And N25 For 500MB Night Plan
Kindly Dial *312*3#
OR
Dial *312# - Then reply with 3 for 500mb for N25 and 1.5GB for N50 [Night Plan 12am - 6am]

That's All.......Cheer's
Read Full Post;

Wednesday 6 July 2016

How to Tweak/change the IMEI of Any Android Device

Tweaking/changing of IMEI  is often common amongst Phone Geeks, tweaking of IMEI will allow the user to have access to certain restricted features on any phone,thus, making the phone vulnerable for anyone to change and Edit the Identity of the Device. Changing of IMEI might be illigal in some countries but because it can change the entire Identity of the Phone, thus, Killing the Brand.

Mobile Uncle Tool

Also changing of IMEI comes with alot of benefits most especially if you are the type that love free browsing. In this article I'm going to walk you through how you can change the IMEI of your Android device, so, carefully follow the steps below:

BENEFITS OF CHANGING IMEI IN NIGERIA.
  • You will be able to use data plans made for Non-Android device on your Android phone e.g BlackBerry monthly and weekly subscription on All networks.
  • You will have access to free data promo bonus made for other devices e.g  325mb, 3gb, 100mb, 2015gb, 1gb from mtn and 500mb, 150mb from Etisalat. Additionally 2gb from Airtel and lots ofnumerous free data. Sounds fun right?
DISADVANTAGES OF TWEAKING/CHANGING IMEI
  • Every thing with Advantage will most definitely have Disadvantage
  • Changing of IMEI is a criminal offense in numerous countries, So note that you are solely responsible for your actions.If you are willing to risk it 
  • You can brick/crash your device if you don't follow the due process carefully. But there is a 5% chance this might happen.
HOW TO TWEAK/CHANGE IMEI ON ANDROID DEVICE
Changing of IMEI is very simple if you follow the due process carefully. As a matter of fact I think I have made much more simpler in this tutorial.

REQUIREMENTS
  • Your Android Device
  • Mobile Uncle Tool
  • MTK Engineering Mode
  • Lastly, your brain.
You can download mobile uncle and MTK from the links below:


PROCEDURE
1. Open and run the mobile uncle tool or the mtk engineering mode app you installed

2. On the app menu, tap on "engineering mode"

Airtel Free Browsing Settings That Powers All Apps
Full Specs And Price Of Samsung Galaxy C5 With 4G LTE


3. A new page will open, select engineering mode (MTK)

4. Another page will open, now swipe right to connectivity page in the mobile uncle or mtk engineering mode app

5. Now select "CDS information"

6. On the new page that opens, tap on "radio information"

7. Another page will open containing two options. This two options appears in phones with dual SIM but if yours is only one SIM, you will see only one option. Now select the preferred SIM you want to do it.
Phone 1 is for SIM one

Phone 2 is for SIM two.
In this tutorial, we are making use of SIM one. So tap on phone one

8. Place your cursor just after the AT+ and type this EGMR=1,7,""

9. Now enter the IMEI number you want to tweak just between the two quotation marks " "

10. After typing the IMEI, recheck and see if it is 15 digits and tap on "Send at command"

11. You will see a small pop up message saying that your command has been msent
That's all. Now to check the IMEI you just tweaked, dial *#06#

Feel free to share this with your friends and remember to ask us anything in the comment box if you need any help.
Read Full Post;