Saturday 6 August 2016

How to Root Any Android Phone within 5 minutes

Hey guys,Are you finding it difficult to root your android device? I know how some Android devices might be stubborn when trying to gain their root access such brands like (HTC,MOTOROLA,SAMSUNG) which are one of the top brands in the smartphone market. These brands produce some of the top Android devices every year,which without (Root Access) you might not be able to enjoy some of the cool features that come with the phones.          


INTRODUCING (KING ROOT) 
Kingroot is the top App used to gain root access of any smartphone by many developer's.the software was design to root any android device in a few minutes.
Kindly follow the steps below to root your Android device within 5 minutes.


HOW TO ROOT ANDROID DEVICES WITH (KINGROOT)
First,you need to download kingroot from GooglePlay store Or you can download it from the link below:
Download kingroot for Android

Download Kingroot for PC

  1. Install the downloaded KingRoot v4.9.5 on your device
  2. After successful installation, start the application and wait for Kingroot to fully analyze your device, after a few seconds you will see the main window,
  3. Click the Big Blue Circle on your device that says Root and wait for a few minutes (make sure you have a good internet connection).
  4. Wait for the rooting to complete 100% after which King User app will be installed on your device.
HOW TO VERIFY IF YOUR DEVICE HAS BEEN ROOTED
To verify whether your smartphone has been rooted or not,Kindly download Root checker from google playstore,install and run it,you will get a success message indicated with green colour.
If you still find it difficult to root your Android smartphone,feel free to ask any question in the comment box below.

Cheers! 
Read Full Post;

Friday 5 August 2016

How to make Glo 0.00 Free browsing stable without Disconnection ( Updated)

Hey guys,As you all know Glo N0.00 free browsing tweak has been blazing for weeks via psiphon handler and Tweakware,but most people do complain that its unstable and does not connect at all.well,today is your lucky day.Just follow the steps below to set up your (Psiphon A+ VPn). if you dont have it you can download it below.  

NOTE!  To make this tweak work perfectly on your device, you need to have a strong and stable 3G signal in your area,if not you might experience some difficulties Using this tweak.Anyway, Follow the steps below to enjoy the tweak       

APN SETTINGS
Name:Techgeez
APN: glosecure
Username: gprs
Password: gprs


HOW TO SET UP YOUR PSIPHON
First,you need psiphon A+ pro,if you don't have it you can download it from the link below.

Download  Psiphon A+ Pro apk android app here psiphon a+ pro

Open it and Tick remove port Proxy

server type: real host

Proxy server: redirect.glo.com

Real proxy server type: SOCKS

Port: 80

Region: United States


MAIN DISADVANTAGE OF THIS TWEAK
After you might have set up everything successfully,you need to wait for 2 to 5 minutes before it connects,but once connected, you are good to go.

Are you stil experiencing difficulties? Feel free to Drop your comments below, and if you are already using the tweak,kindly share your experience.


Read Full Post;

Wednesday 3 August 2016

Smasung galaxy Note7 (Review)


Samsung just launched the Long anticipated (Galaxy Note7) which had alot of controversial specs rumors online, Finally Samsung decided to break the ice by launching the (Galaxy Note7) which by the way is one the best Smartphone out there, The Samsung (Galaxy Note7) came with alot awesome features.

The Samsung Galaxy Note7 stands at the heart of a multifaceted ecosystem that is supported by three pillars - business, games and multimedia.

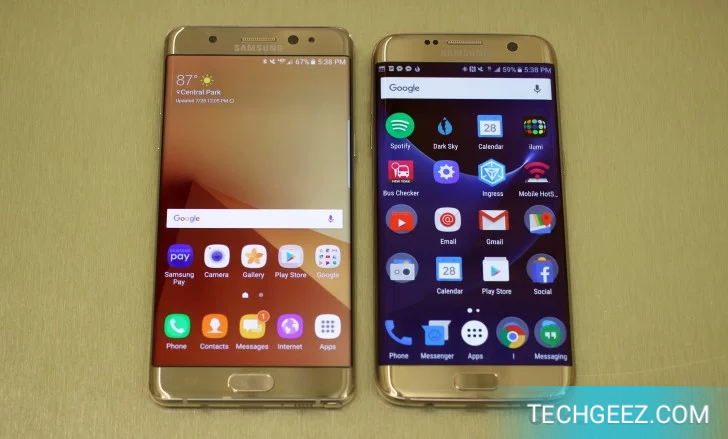
Samsung Galaxy Note7 (left) next to the S7 edge (right)
The Galaxy Note7 wants to rule mobile gaming. VR especially, with a redesigned Gear VR. The phone supports the new Vulkan API, which is just starting to gain ground with PC games. As a nice bonus, you get $25 worth of "console-quality" games at launch.


On the business side, the improved S Pen collaborates with the Always-on screen for even easier note taking. The iris scanner works with KNOX and Samsung Pay to secure your data (both work and personal) and your money even tighter than before.


The Samsung Galaxy Note7 is a media creation and a consumption nexus too. It's one of few mobiles that can display HDR video (an up and coming tech for 4K TVs). With the Gear 360, it can also snap VR-ready panoramas too.


Other accessories come into play too. The phablet's 3,500mAh battery is paired with two new power saving modes and can use an optional wireless quick charger for quick cable-free top-ups. Active users have the Gear IconX wireless headphones and the Gear Fit 2 smart band to look forward to (and you can score the Fit 2 for free!). Also, the S Pen works underwater, so activities are not limited to dry land.

Yes, the Galaxy Note7 is the first Note to get waterproofed - it holds an IP68 certification.

Samsung's own research shows that Note owners use 50% more productivity and business apps than Galaxy S7 owners. And they consume 30% more multimedia. Let's see if the new Galaxy Note7 can live up to the magic created by its predecessors.

Read Full Post;

Tuesday 2 August 2016

How I Added Related Posts Widget To Blogger Blog


Many young bloggers out there usually find it difficult to design and Add some Important widgets on there blog (Related post) widget being at the top of that list,because lets face it, Many readers of your  blog will spend more time on our blog after reading a post,  
If they see more related posts.This will not only increase your page views but it'll make your readers spend more time on your blog.


The realated post widget will show a specific number of post's having the same same label as the current post below your blog posts.


To add Related post widget to your blog,Kindl follow the steps below

===> Log into your blogger dashboard
===> From there goto Layout > Edit HTML and tick the expand your widget templates box (option on the right). If you are using new Blogger dashboard, go to Template > Edit HTML
==> Click inside the HTML and use CTRL+ F to find </head>

Right above  </head> paste the code below.


<!--Related Posts Scripts and Styles Start-->
<style>
#related-posts {
float : left;
width : 350px;
margin-top:20px;
margin-left : 5px;
margin-bottom:20px;
font : 11px Verdana;
margin-bottom:10px;
}
#related-posts .widget {
list-style-type : none;
margin : 5px 0 5px 0;
padding : 0;
}
#related-posts .widget h2, #related-posts h2 {
font-size : 20px;
font-weight : normal;
margin : 5px 7px 0;
padding : 0 0 5px;
}
#related-posts a {
text-decoration : none;
}
#related-posts a:hover {
text-decoration : none;
}
#related-posts ul {
border : medium none;
margin : 10px;
padding : 0;
}
#related-posts ul li {
display : block;
background : url(https://blogger.googleusercontent.com/img/b/R29vZ2xl/AVvXsEhFzoE04T0dV6UATJOMBvWSjRxXq4UGiotcp9RAXnaXBKySz_Hy17CDDPArWfS9f1bjydRpqjL5vjc3F2EQNI7lWwjpCAsxC1P4wJ-BzwXEhLvBjuKmMuE8av_wi7As1SDn4u9lR_Vxdys/s200/greentickbullet.png) no-repeat 0 0;
margin : 0;
padding-top : 0;
padding-right : 0;
padding-bottom : 1px;
padding-left : 21px;
margin-bottom : 5px;
line-height : 2em;
border-bottom:1px dotted #cccccc;
}
</style>

<script type='text/javascript'>
//<![CDATA[
var relatedTitles = new Array();
var relatedTitlesNum = 0;
var relatedUrls = new Array();
function related_results_labels(json) {
for (var i = 0; i < json.feed.entry.length; i++) {
var entry = json.feed.entry[i];
relatedTitles[relatedTitlesNum] = entry.title.$t;
for (var k = 0; k < entry.link.length; k++) {
if (entry.link[k].rel == 'alternate') {
relatedUrls[relatedTitlesNum] = entry.link[k].href;
relatedTitlesNum++;
break;
}
}
}
}
function removeRelatedDuplicates() {
var tmp = new Array(0);
var tmp2 = new Array(0);
for(var i = 0; i < relatedUrls.length; i++) {
if(!contains(tmp, relatedUrls[i])) {
tmp.length += 1;
tmp[tmp.length - 1] = relatedUrls[i];
tmp2.length += 1;
tmp2[tmp2.length - 1] = relatedTitles[i];
}
}
relatedTitles = tmp2;
relatedUrls = tmp;
}
function contains(a, e) {
for(var j = 0; j < a.length; j++) if (a[j]==e) return true;
return false;
}
function printRelatedLabels() {
var r = Math.floor((relatedTitles.length - 1) * Math.random());
var i = 0;
document.write('<ul>');
while (i < relatedTitles.length && i < 20) {
document.write('<li><a href="' + relatedUrls[r] + '">' + relatedTitles[r] + '</a></li>');
if (r < relatedTitles.length - 1) {
r++;
} else {
r = 0;
}
i++;
}
document.write('</ul>');
document.write('<a href="http://www.ogbongeblog.com/2012/01/how-i-added-related-posts-widget-to.html" target="_blank" rel="nofollow"><font size="1" color="black">[Get Related Posts Widget for Your Blog]</font></a>');
}
//]]>

</script> 

<!--Related Posts Scripts and Styles End-->


Click on Save template

Click on save template

Now use CTRL+F to find this line of code


<div class='post-footer-line post-footer-line-1'> 


OR


<p class='post-footer-line post-footer-line-1'>

Now paste the code below immediately after any of these lines (whichever you could find): 

<!-- Related Posts with Thumbnails Code Start-->
<b:if cond='data:blog.pageType == &quot;item&quot;'>
<div id='related-posts'>
<font face='Arial' size='3'><b>Related Posts: </b></font><font color='#FFFFFF'><b:loop values='data:post.labels' var='label'><data:label.name/><b:if cond='data:label.isLast != &quot;true&quot;'>,</b:if><b:if cond='data:blog.pageType == &quot;item&quot;'>
<script expr:src='&quot;/feeds/posts/default/-/&quot; + data:label.name + &quot;?alt=json-in-script&amp;callback=related_results_labels&amp;max-results=5&quot;' type='text/javascript'/></b:if></b:loop> </font>
<script type='text/javascript'> removeRelatedDuplicates(); printRelatedLabels();
</script>
</div>
</b:if>
<!-- Related Posts with Thumbnails Code End-->


Click on Save Template.

Now, go ahead to view one of your blog posts. You should see the Related posts below it.

NOTE: If you did not add a label (category) to a post, you might not see the related posts below it.

You can alter the CSS rules if you want to customize the look and feel

Feel free to share your recommendations or or questions via the comment box


Read Full Post;